
Phreakin’ Phantom
Hasegawa’s F-4E in 1/48
by Mike Hanlon

Hasegawa F-4E – 1/48 Scale
Introduced into Navy service in the late 1950’s, the F-4 series gave the Navy a fighter that met or exceeded contemporary Air Force designs for the first time. So successful was the design that it was adopted for service with the Air Force first as the F-4C and then the F-4D. Originally designed as a fleet interceptor, the Navy planners saw no need for cannon, relying instead on a battery of radar guided Sparrow missiles with Sidewinder heat seeking missiles serving as the close in weapon of choice. Air Force planners in the late 50’s also concluded that cannon were redundant and totally unnecessary in a modern fighter. Service in Vietnam facing Mig 17 and Mig 21 fighters caused the planners to change their minds. First flown in 1967, the F-4E incorporated a 20mm Vulcan gattling gun.
In 1979, Hasegawa released their first 1/48 scale modern jet, the F-4J. Featuring raised panel lines, a full missile load and detailed cockpit; the kit was released for the wallet-crunching price of $20. Despite howls of rage from frugal modelers everywhere, the kit was quickly followed by an F-4B/N and an F-4C/D. Several years later, (1983?) Hasegawa released the F-4E. This was a newly tooled kit featuring scribed panel lines. The F-4EJ, F-4F, and an F-4G Wild Weasel quickly followed.
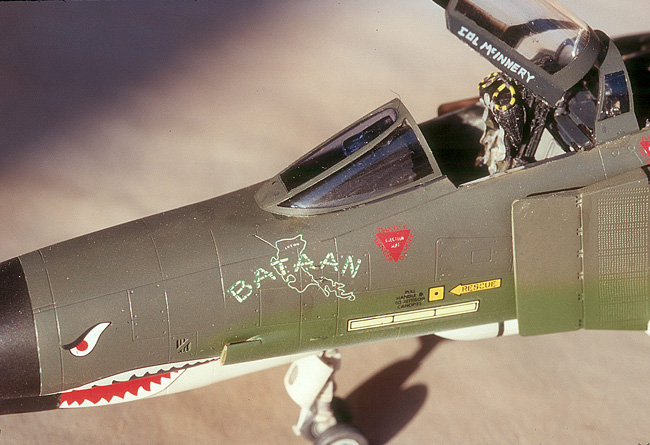
One of the joys of building models for others is that their interests do not always coincide with my own. As I result, I sometimes find myself building kits I hadn’t previously considered building, like the F-4E. The parameters for building the model were Southeast Asian camouflage, white squadron codes, post Vietnam with combat slats, a scheme typical of the late 70’s and earlier 80’s. The kit I was given to build was an original release, the kit decals included appropriate markings, but they were at least eighteen years old and I thought I could do better. Four decal sheets later, I replicated the kit markings for the 3rd Tactical Fighter Wing’s commander’s aircraft out of Clark Airbase in the Philippines, circa 1981.
Construction began with the cockpit, while providing plenty of opportunity for the aftermarket I decided to keep it simple and limited myself to replacing the kits rather anemic looking ejection seats with a pair of Martin-Baker Mk. 7 seats from True Details. The cockpit tub, sidewalls and instrument panel were painted Dark Gull Gray, the instruments dial were painted black and highlighted with Prismacolor pencils. The instrument glass was simulated with drops of Future Floor wax applied with a fine brush. The seats were painted flat black and dry brushed with a medium gray; the details were painted with a variety of Polly Scale acrylics. The True Details seats do not include the ejection handles or face curtains. These were taken from the kit parts, the handles striped in yellow and black with a brush.
The cockpit is attached to the nose wheel bay prior to being glued into the fuselage halves. Test fit to insure a proper fit and check the alignment of the pilot’s instrument panel with the coaming, it wants to gap. I added weight to the nose and glued all of the cockpit pieces together, while the cockpit was still setting up, I placed it into the fuselage and taped the fuselage halves together to ensure a good fit.
Hasegawa F4-E Cockpit
Once the cockpit had set, I glued it into one of the fuselage halves and then glued the fuselage halves together. This was set aside to dry and I skipped ahead to the wings. I started by opening the holes for the Sidewinder racks and drop tank mounts. The wing is a three-piece assembly with the outer panels top and bottom are molded to top wing pieces. Unfortunately, this leaves a seam right through the detail for the wing folds. There is also a seam through the center of the flaps on the underside that requires filling. Thank you Hasegawa!
Returning to the fuselage, I added the two halves of the radome and cannon. Once dry I cleaned up the seams and did some minor filing of the fuselage seam. Before adding the intake pieces, I sprayed the intake area flat white; aircraft gray can also be used for this area. Since the intakes stand out from the fuselage, I masked off the white areas and sprayed the area behind the intakes FS 34019 and 30219 respectively. These areas would be difficult to paint once the intakes and splitter plates were added. I then attached the intakes. Minor sanding was needed to blend them in, but the fit was very good. The splitter plates were left off until final assembly.
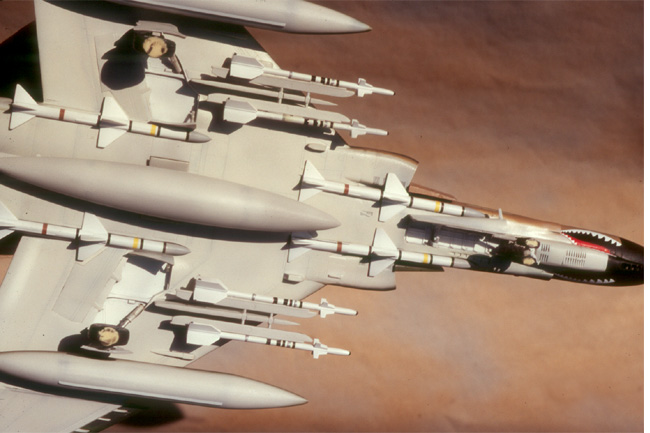
Hasegawa F4-E Underwing Stores
I also added the ECM blister to the vertical fin. This was a mistake as it interfered with the placement of fin cap decal, so I recommend that you leave it for last. The fuel dump pipe is molded to each half of the fuselage. Carefully cut it off and place it somewhere safe. I didn’t do this and broke it off. Half of it is still hiding in my carpet; I replaced it with the pipe from a junked Phantom kit I had handy.
I then attached the wings. There was a small gap at the upper wing root that I filled with white glue. The seam on the underside of wing just aft of the nose wheel bay was terrible; a large seam and step, which runs through the forward Sparrow bay, required a lot of filling. I used putty and super glue to fill this seam and it took several sessions to blend it in. The forward part of the wing assembly extends to the lower side of the fuselage under the intakes. The port side fits flush with the fuselage; the starboard side extends at least a 1/16 of an inch beyond the side of the fuselage. Sanding sticks and super glue to the rescue! Hasegawa provides the option of open or closed speed bakes, I opted for closed and glued them in place.
At this point I began painting, the wheel wells were painted flat white and masked off as were the insides of the gear doors, the landing gear struts, and wheels. I also painted the missiles but more on them later. Once the white had dried, I sprayed the rear fuselage area around the exhausts with Floquil Old Silver. This serves as a base coat for the darker metal colors to sprayed in this area later. Once the silver had dried, I masked it off with Tamiya masking tape. The underside of the Phantom was painted with Gunze Sangyo FS 3662 gray. Prior to spraying the gray, I preshaded the panel lines of the aircraft with Gunze Flat Black. The gray was sprayed over black leaving a shadow that breaks up the monotone of the gray. I also preshaded the upper surfaces before spraying the camouflage. The upper surface was painted in Gunze FS 30419 SEA Tan, Modelmaster FS 34102 Medium Green, and finally Gunze FS 34079 Dark Green. The scheme was sprayed freehand with an Iwata Eclipse. The countershading worked very well for the tan areas, but completely disappeared under the two greens. I restored these areas with Gunze Smoke sprayed along panel lines; I also accented some of the tan areas where I wanted greater contrast. The nose radome was then masked off and painted with Gunze Flat Black.
Norris Graser was kind enough to show me how to finish the natural metal areas around the exhausts. These areas are subjected to extreme heating so the metal is typically found in multihued tones ranging from flat aluminum to burnt metal. Norris sprayed various shades of Modelmaster Metalizers along the panel lines, polished them and then sprayed another shade and repeated the process until he got the effect he was looking for. Norris told me he could do this in 5-10 minutes. He worked for over 2 hours until he got the effect he was looking for. It looks great! Thank you Norris.
A note on the kit exhausts, these parts have the exhaust petal detail molded to the outsides of the exhausts, but the insides are absolutely smooth. Aires has just released a set of replacement exhausts for late model Phantoms to replace these overly simplified parts.
After the exhaust area had set for a few days, I sealed it with Future. I then gave the model an overall coat of Future in preparation for decaling. As I stated earlier the kit decals were old enough to vote so I replaced them with Super Scale sheet 48-147. Ironically, this sheet predates the Hasegawa kit and was designed to fit the old Fujimi kit. I had three problems in using this sheet, the first is that the shark mouth decal was designed for the Fujimi kit and is oversized for the Hasegawa kit. I replaced it with a shark mouth from an Aeromaster Vietnam Phantom sheet. The second problem is that the kit provides four formation strips (slime lights); the Phantom has three strips to a side. This problem was solved by my third problem. I mentioned earlier that I added the ECM blister on the fin cap during the fuselage assembly. This caused all sorts of interesting alignment problems when I tried to put on the fin cap decal, which includes horizontal pin stripes. After ruining the first decal, I stripped it and cut the fin cap decals into smaller pieces and added them individually. I wound up using three sheets to get the fin cap right. On the bright side I now had lots of extra formation strips. At least one of the Superscale sheets was an original release, but I had no difficulty in using them. Once the decals had set I sealed them with Future.
I then proceeded to adding landing gear and underside stores. Care should be taken in aligning the main gear struts, the struts should be vertical, but the cross braces will pull them inboard if you use them to set the alignment. It would be best to glue the main struts in place and add the cross braces after the main gear has set. The nose gear went on with no problems. The gear doors are fiddly but can be added without too many problems. Good references here answer a lot of questions that the kit instructions don’t cover. I replaced the kit tires with True Details parts. The wheel hub detail is much better than the kit parts.
The Sparrow missiles in the kit suffered from injection pin marks and a nasty mold seam. I replaced them with Sparrows from a junked Hasegawa F-4J (also the source of the lost fuel dump). The Sidewinders were better so I stuck with the kit parts. After painting and decaling (stripes, many, many stripes) I set them aside. I then turned my attention to the three drop tanks, each is molded in two pieces with the hard point molded to one of the halves. These required sanding and filling especially along the hard point. The tanks were painter in the underside gray with dark green upper surfaces. Once everything had dried, I glued the Sparrows in place, then the Sidewinder racks and then the Sidewinders. The drop tanks were left for last. It would be difficult to mount the Sidewinders after the drop tanks were in place because you probably knock the tanks loose in the attempt.
Now that the Phantom was on its landing gear, I gave it a coat of Polly Scale Flat Finish. This is a wonderful product with only one drawback. You must filter the Flat Finish through a piece of nylon stocking or you will get little white chunks of flat on you model.
I had originally planned on closing the canopy, but it doesn’t fit in the closed position. Hasegawa’s recent Phantom releases include a separate closed canopy, so I guess they figured it out. I masked the canopy with E Z masks. Prior to masking I sprayed the windscreen with Gunze Clear Blue. The E Z mask streaked the blue, so I stripped it and resprayed the blue on inside of the windscreen. The fit of the open canopies is fiddly; Mr. Graser was kind enough to assist in getting them into place. I don’t trust myself with super glue and clear parts.
At the very last I attached the nose pitot tube and the fuel dump pipe.
Although nearly twenty years old, the Hasegawa Phantoms are still the best F-4 kits on the block. Replacement of the exhausts, the tires, weapons, and an resin interior will render a model which can stand up to the best kits being produced today.
