
Hasegawa F-86 Sabre in 1/48
by Mike Hanlon
Hasegawa F-86 Sabre
Introduced in 1996, the Hasegawa F-86 was released in two versions, the F-86F-30 and –40. Priced at $40 when released, subsequent releases have ranged from $30 – $47. So if you want one shop carefully.
The primary difference between the two blocks was the wing configuration. The –30 had the 6-3 hard-edged wing with wing fences. This was the definitive Korean War dogfighter allowing the Sabre a higher rate of roll and increased rate of climb necessary to compete with the Mig 15. It also increased the landing and stall speeds. The-40 reintroduced the leading edge slats deleted in the-30 and extended the wing span an additional 12 inches, the ailerons were also increased in length. This version was used by the newly established Japanese Air Self Defense Force and was supplied through the Military Assistance Plan to countries all over the world in the Fifties and Sixties. The Pakistani Air Force used the –40 successfully against Hawker Hunters of Indian Air Force during the 1965 war. One Pakistani pilot scored eleven kills in the Sabre.
Hasegawa F-86 Sabre
Hasegawa’s initial release had the two blow-in doors on the fuselage molded incorrectly. These doors hinge at the front, the kit has them opening from the rear. Hasegawa corrected this error on subsequent releases. I chose not to correct this on my kit. A second problem exists in the form of an auxiliary air intake on the starboard rear fuselage. This intake was specific to the –40 only. On my model I glued a thick piece of Evergreen strip to the inside of the fuselage and then sanded the intake off. The plastic strip filled the majority of the hole and I filled the remainder with superglue. I then sanded and polished this flush with the fuselage.
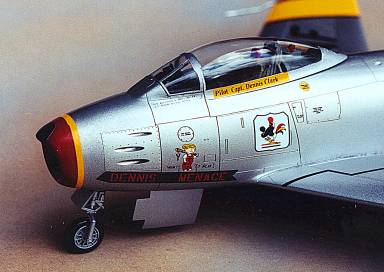
The interior of the kit is vintage Hasegawa, okay but not great. I bought the Kendall interior set and used this in place of the kit parts. Unfortunately, Hasegawa did not mold any detail in the area behind the ejection seat. If you leave the canopy open you will have to cut this area open and scratch build the interior detail; no parts are provided for this area in the Kendall set. After spending three weeks fiddling with the resin parts, I found that I was going to have to close the canopy. My advise is to get the Kendall ejection seat, which can be bought separately and use the remaining kit parts. The Kendall parts did fit well, and the instrument panel and ejection are markedly better than the kit parts. Of course with the canopy closed you can’t tell.
Enough whining (well almost.) A nice feature of the kit is the inclusion of intake and exhaust pipe covers. This allowed me to glue lead weights into the intake pipe and not worry about trying to hide them in the fuselage. The nose gear well was then added to the interior. Assembly of the fuselage was uneventful. The resin interior caused a little spreading of the fuselage halves around the cockpit, but a little superglue took care of this problem. Once the fuselage halves were assembled, I attached the nose intake. Kendall makes a resin replacement for this part which always puzzled me. After gluing the piece in place I now know why. The intake lip is oversized and required a lot of sanding, filling and polishing to get it to blend in. Not a big problem but surprising in a Hasegawa kit.
Once the intake is faired in, test fit piece A21, which holds the nose lights and fits behind the intake. I had to trim mine down quite a bit to get it to fit and then filled with superglue. I guess it was done by the same guy who did the nose intake.
Once the fuselage is done, open the flashed over outboard holes in the lower wing for the drop tanks and the holes in the upper wings for the wing fences. Glue the wings together and attach to the fuselage. Some minor clean up of the lower, aft wing seam may be necessary. Test fitting will probably minimize this.
At this point, I stopped gluing things together and started painting. The wheel wells and fuselage airbrake interiors were painted Interior Green. Overspray was cleaned off and I masked the wheel wells off. The airbrakes doors fit flush so I pressed them into place to mask the airbrake interiors. The aircraft was then polished with polishing pads. I also polished the gear doors and tail planes. The Sabre was painted with SNJ Aluminum overall. This product is very thin and sprays straight from the bottle. I had some minor problem areas on some of the panels (my fault.) I masked these off, re-polished them and then sprayed them with Floquil Old Silver for variety. The Floquil was actually lighter than the SNJ, which broke up the monotone of the straight SNJ. I masked off the exhaust area and several fuselage and wing panels with Tamiya Masking tape and over sprayed with Gunze Sangyo Smoke. I now had three distinct panel tones in the overall natural metal. I really liked the way this turned out. I painted with wing tanks, gear doors and other detail parts with SNJ at the same time. Other than the overall natural metal finish the only other painting required was the red for the intake, a light gray for the fin cap and a yellow trim tab.
Once the painting was completed, I added the tailplanes and landing gear. The nose wheel strut has a large square pin which is very shallow and is supposed to fit into a square depression in the nose wheel well. It was a little oversized on my kit and I carefully sanded it down to fit. Other than that, I didn’t have any problems with the landing gear or the gear doors.
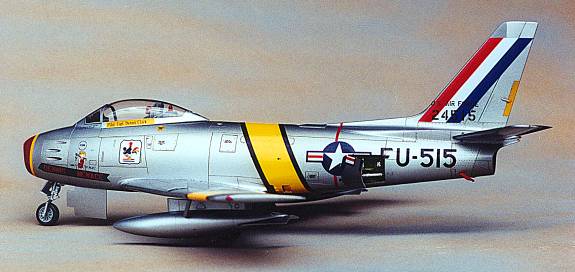
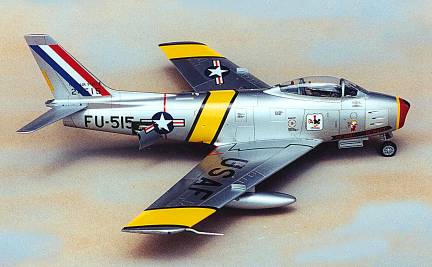
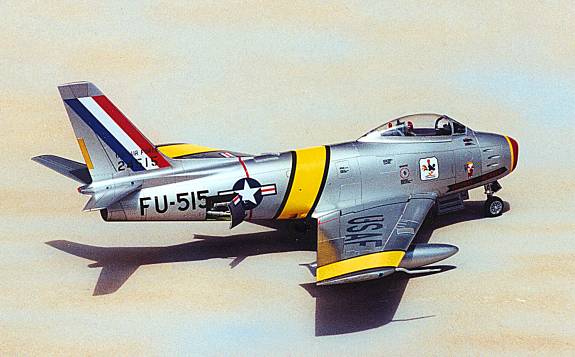
I then glossed the Sabre with Future and gave it a light oil wash. I planned on using Aeromaster sheet 48-278 Sabres over Korea Part III which featured ‘Dennis the Menace’ an F-86 30-NA from the 67th Fighter-Bomber Squadron. This sheet requires the modeler to paint the yellow ID bands. Four subsequent releases have included the ID stripes as decals so I picked up Aeromaster sheet 48-446 imaginatively named Sabres over Korea part III. Neither sheet has any stenciling and I thought I would have to use some of the kit decals, but low and behold in July Aeromaster released an F-86 stencil sheet. $22 worth of decals and I was ready to go!
I started with the ID stripes applying the upper side decals first. The wing stripes are oversized and I trimmed them to size after they had set. I then applied the underside stripes and trimmed them. The fuselage stripe comes in two pieces. The first wraps around the fuselage and the second is applied to the underside of the fuselage. This piece is also slightly oversized. Next time I will take a little more care in trimming it as I had some overlap. The remaining decals all went on well. The national insignia on the fuselage sides overlaps the airbrakes so I applied them while the airbrakes were still press-fit into the fuselage. After they dried I carefully ran an X-acto blade through the seam and removed the airbrakes. All in all it took about four nights to apply the decals. Interesting enough, the three sheets were produced for Aeromaster by Microscale in the US, Cartograph in Italy and an unidentified company in Mexico. All of the decals performed admirably and the only problems I experienced were self-inflicted.
Final assembly included adding the drop tanks, clear parts and attaching the airbrakes. The airbrakes hang down on the real aircraft so check some pictures before attaching them to the fuselage.
All in all I was very pleased with this kit. Removing the superfluous air intake was not a big deal and the fit is very good. I still have two unbuilt kits, a –30 and a –40. When I get around to them, I plan to do a camouflaged RAF Sabre Mark 4 (a US built –30), and a natural metal Norwegian –40.
Now if someone would only produce a decent Fury!
F-86 Sabre cockpit
F-86 Sabre starboard rear
